I think it’s about time I wrote another article, don’t you?
The funny thing is that I’ve had a draft sitting half-completed for a few weeks now, and this isn’t it! In that draft, I’ve written about some nice (some may say, essential) features for your development tools, because that’s what I’ve been working on for Pandemonium lately. However, a post on the XNA Creators Forums the other day caught my eye, and reminded me of when I used to work on the in-game camera for Kameo, and then I put the disc in my 360 for old-times’ sake, and that inspired me to start this mini-series on third person cameras, based on what I learned during the development of that game. (I’ll almost certainly finish the tools article next, then come back to this mini-series, and so on like that for a while, dipping in an out of each. Note that I don’t promise this mini-series will finish, or even progress, quickly! But over time, it should add up to have some pretty cool ideas).
Incidentally, for those of you who haven’t played it, you can almost certainly pick up Kameo in the bargain bin nowadays and it’s well worth a look. It’s not without its flaws (some of the adventure sequences are a bit dull and the story doesn’t always make complete sense), but it’s still one of the most vibrant and refreshing titles available on the Xbox 360. The combat sequences are pretty good fun, it’s got some really memorable bosses, a phenomenal soundtrack, and (especially given that it was a launch title) it looks very pretty – I defy anyone not to watch dawn break over the Enchanted Kingdom and not go “wow”. It got some criticism at the time for being a bit short for the money, but by criminy it’s eight quid on Amazon now! Probably even cheaper somewhere else. Get involved.
The Very Beginning
Anyway with that bit of blatant and shameless advertising out of the way, let’s talk cameras, starting at the very beginning. The camera is what shows the player what is going on in any 3D game. The player never sees it, and they can’t always control it, but without it you’d be stuck. It is exactly analogous to a movie camera – it’s there to show the audience (the player) what the actors (the player’s avatar and other in-game characters) are doing. Everything in the game world that you see on the screen, you see from the camera’s point of view.
The mapping from the 3D game world to your 2D television screen is called a projection; I won’t go too deeply into the maths just yet (and in fact in XNA, DirectX, OpenGL and other 3D SDKs, functions exist to perform much of the maths for you) but basically a projection transforms a 3D vector in world space to a 2D vector in screen space. Fundamentally speaking there are two types of projection (hence, two types of game camera).
An Orthographic camera performs a parallel projection. Basically, this has the effect that something 2 metres tall 100 metres away, looks the same size on screen as something 2 metres tall 5 metres away, and the viewer can only tell which is closer by seeing which is drawn in front of the other. This is not how we are used to seeing the real world, so isn’t much used in games nowadays. That said, the old isometric games show what an orthographic projection looks like (even if they’re not truly rendered in 3D), and it’s sometimes used for user interfaces, maps and such like. In fact – if you’ve ever used a 3D modelling tool like Max, Maya, Milkshape, Blender etc., you’ve almost certainly used an orthographic projection in the “side-on” or “top-down” views. I won’t go into too much detail about these here though; if you’re interested, look up Matrix.CreateOrthographic in the XNA documentation.
Much more common in games is the Perspective camera, and that’s the type of camera I’m going to concentrate on in this series. In this projection, items closer to the camera are drawn much larger than items the same size that are further away, which matches human eyesight.
The Perspective Projection
We need to know a certain amount of information in order to be able to perform the perspective transformation. First is the field of view. This value represents how wide an angle the camera can see, and by convention is usually given as the vertical angle – the vertical field of view, or sometimes abbreviated to fovY. (Some modelling tools use the horizontal field of view instead, so be careful). Next is the aspect ratio. Computer screens are rarely square, and never circular (like the human eye can see), so the aspect ratio gives the width of the projection compared to the height of the projection.
Deciding on what values to use will depend on your game, but as a starting point, consider that the human eye has something like a 150 degree vertical field of view, and an aspect ratio of something like 1.15, ie. you can see more horizontally than vertically. However – nobody ever sits so close to a computer screen that it fills their entire field of view, and the angle from your eye to the top and bottom of your monitor is usually something like 45 degrees, so that’s a good starting point for your field of view; and the aspect ratio is easy. If your monitor or television is “standard” 4:3, the aspect ratio is 4/3 = 1.3333, while if it’s “widescreen” 16:9, the aspect ratio is 16/9 = 1.7777, etc. (And therefore, if the camera view only fills part of the screen in your game, the aspect ratio will simply be the width of the view window divided by the height). We’ll talk more later about what effect changing these values has – you can get some desirable special effects, and some undesirable bugs, by altering them.
Important note: I’ve used degrees for the field of view above, because that’s what most people are familiar with. Most 3D systems, including XNA, use radians for angles instead – and if you get funny results, it’s probably because you’re using the wrong units! You can use MathHelper.ToRadians to convert from degrees to radians, or some special values have predefined constants, for example 45 degrees is the same as MathHelper.PiOver4 radians.
There’s a couple more values needed for a perspective projection but, unlike field of view and aspect ratio, they don’t have a counterpart in the real world. Your eyes can see things right next to them, even touching them (I had a wasp walk over my eye, once – it was terrifying!) and, if nothing gets in the way and the light has time to get to you, infinitely far away as well. That gives an infinitely large range – and computers are very bad at handling infinity. To make life easier for the computer, we define a minimum and maximum distance – the near clip and far clip values – outside of which, we don’t want to draw anything. Choosing these values is very much game-dependent. In a game where a human is the main character, a near clip of 0.1 metres and a far clip of 1000 metres might be OK. In a game based around spaceships travelling light years in a few seconds, that wouldn’t work! Again, there is a relationship between the near clip and far clip distances that you don’t want to get wrong, and we’ll talk about that later.
I like to think of this as being like sitting in a dark room with one window. You sit in the room and look out. You can’t see anything in the room, it’s too dark (even if there’s something between you and the window – yeah, the analogy breaks a bit there) so the distance between you and the window is the near clip distance. Outside the room, you can only see things that pass behind the window – anything in the vertical field of view (the angle between your eyes and the top and bottom of the window) and the field of view modified by the aspect ratio (the ratio of the width of the window divided by the height. In your imagination, draw a line from your eye to the edges and corner of the window. Can you see that this would form a pyramid? Now extend the lines, out into the world beyond the window. Stop at your far clip distance. Now you have a really big pyramid. Take off the smaller pyramid (inside the room) and you’re left with a shape called a frustum, in this case, a view frustum. Everything inside this frustrum can be seen through the window – so everything in the view frustum in your game will be drawn to the screen. It looks a lot like the red shape shown here (based on original diagram here):

The view frustum of a perspective projection
(Note, I’ve not shown the horizontal field of view, it should be obvious. However, the maths to calculate it isn’t… it’s not fovY * aspectRatio, as you might guess. It’s actually 2 * atan( tan( fovY/2) * aspectRatio ), for reasons of geometry. Aren’t you glad you wondered, now?)
The maths to perform the projection from items in the frustum onto the screen is a bit complicated, luckily, it’s all done with Vector3’s and Matrix’s, and XNA provides a function to generate the projection matrix (which performs the transformations of your perspective projection): Matrix.CreatePerspectiveFieldOfView, which takes as arguments the field of view, aspect ratio, near clip, and far clip, exactly as just described.
Defining the Camera View
So now we know how a view frustum performs a projection to draw things in the game world, onto the screen. But which things? Or to put it another way: how do we position the view frustum to show what we want? Answer: by defining the position and orientation of the camera.
It’s pretty obvious what the position means. If it were a “real” camera, like in a movie, it’s the point in space where the camera (or perhaps more specifically, the camera lens) is. You just need to make sure you put it somewhere sensible so the player can see what’s going on. (How? We’ll get to that!)
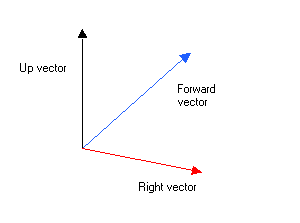
The orientation is fairly straightforward too. It’s the direction the camera is looking in – this gives us the camera’s forward vector, literally, the direction you’d move in to make the camera go forward. Obviously, you’ll want this to point at whatever the player wants to see, and again, we’ll talk about how later… Of course, you can hold a camera upside down (and, if you’re making a flight sim, your planes can fly upside down!) so we also need to know which way up the camera is being held: the up vector. Finally, it’s sometimes useful to know the right vector – think of your head. Your eyes are looking in front of you (the forward vector), the top of your head is usually towards the ceiling, unless you’re doing yoga or something (the up vector), so the right vector is pointing out of your right ear. These three vectors are mutually orthogonal, which is a posh way of saying there’s ninety degrees (or MathHelper.PiOver2 radians!) between each of them. (See diagram here).
The tricky bit comes in deciding how to represent the orientation. (It’s important to understand the following are all different representations, and for any given orientation, it’s possible to represent it in any of the following ways). We can either simply pick a point in space, and say “the camera is looking at this point” – this is the target or look-at point.
Or, we can assume that the “natural” orientation of a camera is for the forward vector to be looking down the Z axis (known as -Z, -Vector3.UnitZ, or Vector3.Forward – remember XNA uses a right-handed coordinate system!) and the up vector is directly upward (known as +Y, Vector3.UnitY, or Vector3.Up). Of course this implies that the right vector is along the X axis (+X, Vector3.UnitX, or Vector3.Right). From this “natural” orientation, we can rotate it – either using angle values for yaw (rotating horizontally around the Y axis), pitch (rotating vertically around the X axis), and roll (rotating side to side around the Z axis), known as Euler angles (pronounced “oiler”), or by using a single Quaternion value. Each of these methods – Euler and Quaternion – have advantages and disadvantages (Euler is easy to understand, but can encounter issues in certain orientations that quaternions, to all intents and purposes, don’t) and which to use depends on your game. If you’re making a flight sim or other game in which the camera can roll a lot, use quaternions. Otherwise, either can be made to work, and Euler angles are certainly easier to conceptualise.
We can combine the position and orientation into a single view matrix for convenience, and no prizes for guessing that XNA makes it easy, via Matrix.CreateLookAt, Matrix.CreateFromYawPitchRoll, and Matrix.CreateFromQuaternion.
Our projection matrix and view matrix now tell us everything we need to know. When we went to draw something, we pass these matrices to the shader (sometimes along with the World matrix, which represents how the game world or object being drawn is transformed; in the case of the game world, it is usually Matrix.Identity) and it performs the complex transformation maths for us. Note that the projection matrix might not change much during gameplay, but that the view matrix might change in every frame that the camera moves.
So all that’s left is to work out where to put the camera, ie. what values to pass in, in order to get the appropriate view matrix. Should be easy! Right? Well… the number of games reviews where I’ve read “game X has a really bad camera”, and the fact I spent probably 40% of my time for three years coding Kameo’s camera (happily no reviews I saw complained about it), suggest it’s not that simple. (Don’t get too scared. Kameo had 11 player characters and over 20 camera modes. Your game will probably be a lot simpler!) So how can we decide where to position the camera?
Deciding the Camera Position
At a very high level, there are basically three ways to decide how to position and orientate the camera, and they arise from the way that in most cases, you either have something you want to look at, or somewhere you want to look from, or both. (If you have neither, and don’t know where you are or what you want to look at, well, good luck with that!).
First consider the case where you know where the camera is, but you don’t know what you want to look at, just a direction. The most obvious example of this is the first-person shooter. The camera is inside the player character’s head, and the player decides in which direction to look and move. Or, imagine a driving game or flight sim where the camera is placed inside the car or plane, looking out of the front window. This kind of camera is very simple: the position is known, and you can use Matrix.CreateFromYawPitchRoll (for example in a FPS) or Matrix.CreateFromQuaternion (for example in a flight-sim interior camera) to work out the rest of the view matrix.
Example: Halo.
Secondly, imagine you know where the camera is, and also know what to look at. An example might be a track-side camera in a racing game: it’s fixed in position, but as a car races past it turns to follow it. Or, imagine a security camera that follows the player (a bit like in Ico). It’s even easier if the camera is fixed in both position and orientation, like in the early Resident Evil games. Again, this kind of camera is very simple: the position is known, and you can use Matrix.CreateLookAt to work out the rest. (Of course, track-side cameras should have some inertia to follow the cars more naturally, and the camera in Ico has quite a few more complex features as well, but the basic functionality is very straightforward).
Example: Ico.
The final category (and by far the most interesting) is where you know what you want to look at, but not the position you want to look at it from. Many game genres fall into this category.
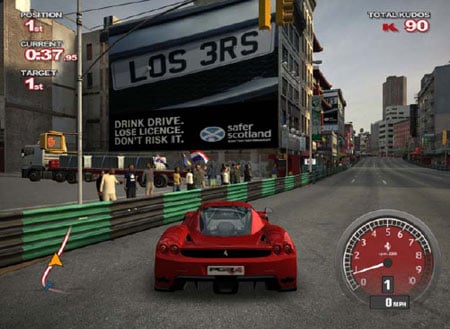
Sometimes, it’s fairly easy to work out where the camera should be. In an arcade racing game, the obvious target is the player’s car; and the player will want to see where they are driving. So, you need to position the camera somewhere behind and above the car, looking somewhere in front of it. Of course, you’ll want the camera to follow the car as it turns, and if the player reverses into a wall you need to make sure the camera doesn’t go on the other side of the wall, but still, this is pretty straightforward. (An example from a non-racing game might include the early Tomb Raiders, and I think the Gears of War over-the-shoulder camera probably belongs here as well).
Example: Project Gotham Racing 4.
Another example of this category is to be found in the RTS genre. Here, the camera looks at the units or terrain the player is interested in, but the player can control where it looks at them from. Assuming you position the camera high enough not to bump into buildings and trees, again, this is quite straightforward – store the look-at point and move it around the battlefield, then let the player control the angle they want to view it from, and position the camera a fixed distance in that direction.
Example: Age of Empires 3.
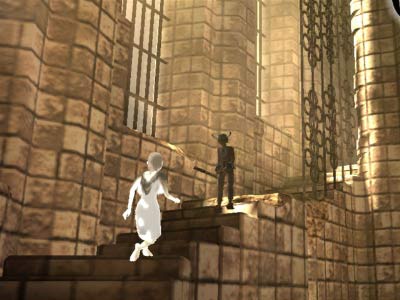
So finally we come to the most interesting cameras of all, and the ones I will be concentrating on in this mini-series: the third-person camera. In games of this kind, the camera and the player are controlled independently. The camera must move around the game world, giving a good view of the player character, while moving around and among the terrain the player moves around and among. There are some very difficult (and hence interesting) problems to overcome – how do you stop the camera going through walls? How do you ensure there is always a good view of the player? To what extent should you let the player control the camera position – and even more importantly, to what extent should you require them to? Games with cameras like this include platformers, like Mario or Banjo Kazooie; parkour-style action games like Prince of Persia; and adventures or RPGs like Fable, or, of course, Kameo.
Check out this screenshot of Kameo in action. She’s standing among the tall grass now, cheekily glancing back at the camera – but she could move in any direction and the camera would have to follow her. She could go for a swim, run around the tree, move right up to the edge of the cliff, go into the house; climb to the very top of the castle and jump off it. No matter what she does, the camera has to follow her, and show her doing it in a way the player can understand and react to. That’s not easy! But it is absolutely fascinating. I hope this series will demonstrate that, and you’ll find it entertaining and useful.
Anyway I’m moving house next week – so not sure when the next update will be – so, until next time, farewell from me…!

